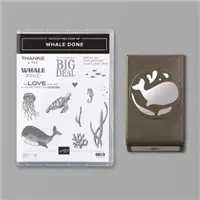
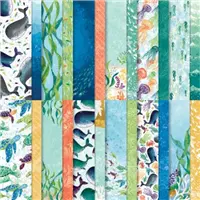
Have you seen the Whale of a Time DSP from Stampin’ Up? It is in the Annual 2020-2021 catalog. Do you have beautiful Designer Series Papers in your collection? Are you stumped on how to use them? I would like to share a couple of cards that I made using the Whale of a Time DSP. The first step is finding the perfect patterns from this wonderful collection.

This gorgeous 6″ x 6″ Designer Series Paper coordinates with Balmy Blue, Blackberry Bliss, Bumblebee, Calypso Coral, Granny Apple Green, Just Jade, Pacific Point, Pool Party, Pretty Peacock, Shaded Spruce, and Basic White. And don’t forget the Whale Done Bundle. Save 10% when you purchase the stamp set and the punch together.


And here are my cards.


CREATING THE BACKGROUND
- Paper
- Thick Basic White cardstock:
- 4-1/4″ x 11″ scored at 5-1/2″ for the card base
- 3″ x 1/2″ for the sentiment on Whale card
- Pacific Point cardstock: 3-1/4″ x 4-1/2″ for card panel on Whale card
- Whale of a Time DSP
- 3″ x 4-1/2″ coral floor design for Whale card
- 4 pieces of coral floor design 3″ x about 1-1/2″ for Sea Turtle card
- Whale and Sea Turtle design (OPTIONAL: back with Smoky Slate cardstock)
- 3″ x 1/2″ Bumblebee fish school design for sentiment on Sea Turtle card
- Thick Basic White cardstock:
- Stamp Sets
- Whale Done (sentiment)
- Dies & Punches
- OPTIONAL: Whale Builder punch
- Inks & Markers
- Pretty Peacock ink pad
- Other Supplies
- Clear Epoxy droplets (retired) OPTIONAL: Use Woven Threads sequins or dabs of Fine Tip Glue Pen
- Multipurpose Liquid Glue
- Dimensionals
- Glue Dots
- Linen Thread
- Tools
- Snips & Bone Folder
- Paper Trimmer
- Take Your Pick Tool
Stamp the Good Morning Magnolia image onto the vellum panel using Basic Gray ink. The lines will be blurred by the Stampin’ Blends and the alcohol to create a faux watercolor effect.
Color the image starting with the lightest color. Use Dark Daffodil Delight for the center. Dip a fine-tip paintbrush into the rubbing alcohol and gently move the color. I added Champagne Shimmer Paint to my rubbing alcohol.
Next, color non-adjacent petals with Dark Flirty Flamingo. Gently blur the stamped line. Let dry and repeat on other petals. Do the same for the leaves. TIP: Blow into a straw to gently direct the ink flow in the desired direction.
Add a second layer of color after the image is dry. Repeat the process of alcohol painting and gently blowing the ink.
OPTIONAL: Pick up some clean rubbing alcohol with the paintbrush and flick it over the image. This will create small droplets that will lighten some areas by moving the color outward.
Adhere the vellum panel to the Basic White cardstock panel using Stampin’ Seal or a light amount of Multipurpose Liquid Glue. Add to Basic Black card base.
Stamp the sentiment in White Craft ink and heat emboss with with embossing powder. Trim to you liking. Add to card panel with small black Dimensionals.
Customize the message insert and the envelope with some flicks of color from the brush end of the Stampin’ Blends.
Are you wondering why I suggested that you back the Sea Turtle and Whale paper with Smoky Slate? It is definitely a little more difficult to fussy cut but I like the extra ‘weight’ that the cardstock provides. It gives some rigidity to the image so it doesn’t ‘flop’.
Fussy cut the Sea Turtles and punch out the Whales. Do a whole sheet so that you can make plenty of cards or embellishments for your scrapbooks. The Whale Builder Punch will work on the larger whale images in the DSP. Use the punch on the whales and layer on a whale punch of Smoky Slate. TIP: Multipurpose Liquid Glue is the best for layering because it allows little wiggle time to line up the images. Caution! Use only a little glue. If you have a hard time controlling the squeeze, put some glue on a scrap of paper and use a strip of paper as a paintbrush to apply the glue.

TIP: Use your Take Your Pick Tool to help allign the DSP in the punch. Piece too small to grap? Add a ‘handle’ of scrap paper to the back of the DSP and use it as a lever to allign your image.
Now that you have all your pieces and parts ready let’s assemble the cards.
Sea Turtle Card
Apply the rectangles to the card base. Overlap and rock them as it pleases you.
Stamp the sentiment from the Whale Done stamp set on the Bumblebee fish school design piece (3″ x 1/2″) using Pretty Peacock ink. Add 3 or 4 Dimensionals to the back. Layer on the card base as shown.
Add turtles. Use Dimensionals behind larger turtle and smaller turtle under sentiment. Place Clear Epoxy dots or sequins for a little extra interest.

Customize the inside message panel and envelope with another fussy cut sea turtle for super special presentation.
Whale Card
Add the Pacific Point panel onto the card base a little askew. Then add the 3″ x 4-1/2″ coral floor design DSP.
Stamp the sentiment on the Basic White 3″ x 1/2″ strip using Pretty Peacock ink and the Whale Done stamp. Layer the sentiment on a scrap of Whale of a Time DSP. I used the backside of the Jelly design DSP. Add 3-4 Dimensionals to the back of the layered sentiment strip and place it on the card panel as shown. TIP: Place sentiment a little below the midline to ‘ground’ the grouping of whales and coral sea bed..

Add the punched whales. I used Dimensionals behind the top whale. Place the Clear Epoxy droplets above the blowhole. OPTIONAL: Use the Fine-Tip Glue Pen and add a drop then drag the tip to make a droplet. I suggest practicing on a scrap of cardstock and allowing overnight drying time.
Complete your card with a double linen thread bow and some personalizing on the inside message panel and envelope.
BONUS CARD

Add a little foliage die-cut from Pacific Point using the Forever Fern dies and a frame in Just Jade from the Tasteful Label dies. Use those awesome fish from the Shark dies. It is so fun to create cards from a pile of parts. I hope you will pile up some pieces and parts and create freely.
See how simple it is to make fun cards with only a few tools? Grab some awesome Whale of a Time DSP and you can create cards that have the wow power of Aquaman by artfully cutting, punching, and adding Dimensionals. All the products used in these cards can be found on the links below.
SUPPLY LIST
Click on product image to SHOP 24/7
If the images do not display on your mobile device, head over to MurrayStampsINK.com to get the complete list.