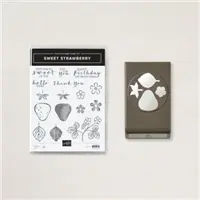
Are you a reluctant stamper? Do you like to scrapbook? I am going to share with you a fun Strawberry Patch Scrapbook Page idea using Stampin’ Up! Berry Blessings Designer Series Paper and very little stamping, if any. This patterned paper was available during the early 2021 Sale-A-Bration event. Taking advantage of the sales and exclusive limited-time events at Stampin’ Up! is something that should be on your list of things to do.
Here is my Strawberry Patch Scrapbook Page.

There are a 3 tools that I find VERY useful in my scrapbooking arsenal.
- Paper Trimmer & Excellent Sharp Scissors
- Cut & Emboss Machine
- Clear Ruler with grid lines
I find the Stampin’ Up! Paper Trimmer easy to use with measurement value marks at 1/16″ and up. The cutting base starts at 7-3/4″ and an arm expands to 17″ for larger papers. It is smooth and easy to operate. Cutting blades are replaceable and easy to install.
There is no comparison for sharpness with the Stampin’ Up! Paper Snips Scissors. With the precision ground tips, you will be able to cut into small areas with ease from tip to end of the blades. Here is a quick blog post on how to care for your Paper Snips.
If you are using metal dies, you will need a Cut & Emboss Machine. The Stampin’ Up! version comes in 2 sizes: regular and mini. It folds for easy transport to scrapbooking events. The manual hand-crank is smooth and does not require electricity which expands its versatility. Learn More HERE.

Contact me anytime to learn more about these tools and learn how you can get them at a discount.
Now onto creating the Sweet Strawberry Scrapbook page. You will need the following supplies,
MEASUREMENTS & SUPPLIES
- PAPER
- Berry Blessings Designer Series Paper
- Basic White cardstock
- 12″ x 12″ soft green cardstock
- STAMP/DIE BUNDLE
- OPTIONAL: Sweet Strawberry Bundle with Strawberry Builder die
- any stamp with journaling lines
- DIES & PUNCHES
- Stitched So Sweetly dies
- Playful Alphabet dies
- Banner Pick a Punch
- INKS & MARKERS
- Old Olive ink pad
- Poppy Parade Stampin’ Blends
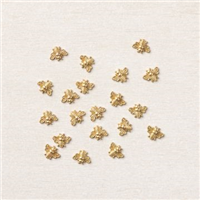
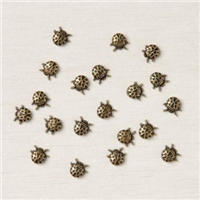
- OTHER SUPPLIES
- Lady Bug or Bumblebee Trinkets
- Adhesive Sheets
- Dimensionals
- Glue Dots
- Stampin’ Seal Permanent
- TOOLS
- Paper Trimmer
- Paper Snips
- Cut & Emboss Machine
CREATING PIECES & PARTS
Photo Frames and Journal Blocks
This layout incorporates 2 – 4″ x 6″ photos and 2 journaling blocks. It is important to title and journal on your scrapbook pages to tell the story to future viewers. The journaling does not have to be extensive. It should include the date, identify the people, and maybe the location.
Cut the photo frames 1/4″ larger than the photo. Die-cut 2 journaling blocks from the Stitched So Sweetly dies and stamped them using the Old Olive ink and my journal line stamp.
Place the frames on the 12″ x 12″ page using the clear grid ruler to keep the edges straight and even. I like to keep a 1/2″ – 5/8″ border around the entire page.
There was an 1/8″ strip of scrap which I added to one edge.
I cut a 1″ strip of patterned paper that matched the photo frames and fish-tailed the ends using the Banners Pick A Punch. Then tucked the banners behind the journaling block.
Strawberry Patch Title
Use the Stampin’ Blends to layer lines of color (dark to light) on a strip of Basic White cardstock. Back the Basic White cardstock with an Adhesive Sheet. Next, use the Playful Alphabet dies to die-cut the letters for the title. Now you have sticker letters.

I have a set of rulers to help me place my titles. Thickers has wonderful alphabet alignment guides.

Strawberry Clusters
Select the patterned paper with the large strawberries from the Berry Blessings paper pack. Fussy cut the strawberries, leaves, and small flowers from the paper.


Layer the pieces onto a scrap of Basic White as shown. I used the smallest scalloped die-cut from the Stitched So Sweetly die collection but any small scrap will work. TIP: Creating clusters makes it easy to move them around before adhering them to your project. Do you see a potential use for these clusters on a card? and visa versa?
Use a Silicone Craft Mat when working with cluster designs because the adhesive does not stick to its surface. This will prevent the ‘oops’ moment when you glue something to the table. LOL!
Finishing Touches
Stamp and fussy cut a flowering branch and some extra flowers from the Sweet Strawberry stamp set. This is optional and the page looks just as nice without them.
Don’t let those partial images go to waste. Tuck them behind the journaling block.
Add a couple Ladybug or Bumblebee trinkets and you are ready to head to the Strawberry Patch for some summer fun.
One of the absolute best things about Stampin’ Up! is the color coordination across the product line. It makes finding the right colors easy which gives me peace of mind and more time to design. I just know that the colors will be right.
Please head over to my SHOP (open 24/7 just for you!) to purchase any of the products you might need for creating coordinated scrapbook pages. If you would like help with design or ideas, contact me and I will be glad to assist you. This is just one of the services that I offer to all my customers.
SUPPLY LIST
I have a limited number of Berry Blessing Designer Series Paper kits available. Please contact me if you would like to purchase one of these kits.