Here is a quick Pansy Petal card from my pile of pansies. I die-cut the bottom pansy petal from the Expressions in Ink Designer Series paper. Isn’t this the Perfect Pansy?

MEASUREMENTS & SUPPLIES
- PAPER
- Thick Basic White cardstock: 4-1/4″ x 11″ scored at 5-1/2″
- Solid cardstock for the pansies: Polished Pink, Evening Evergreen, Soft Succulent, Basic Black, and Gold Foil Specialty Paper
- Expressions in Ink Designer Series Paper
- Pattern Party Designer Series Paper (Earn this one with $18 in Stampin’ Rewards – value $30. Contact me for more detail.)
- STAMP SET
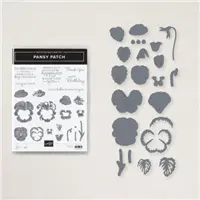
- Pansy Patch stamp set
- DIES
- Pansy dies
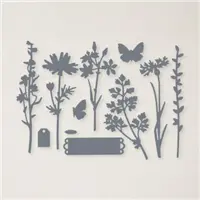
- Meadow dies
- Basic Border dies
- INKS & MARKERS
- Polished Pink ink pad
- White Craft ink pad
- Basic Black marker & Stampin’ Blend
- OTHER SUPPLIES
- Dauber or Blending Brush
- Multipurpose Liquid Glue
- Glue Dots
- Dimensionals
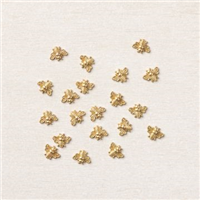
- Bumblebee Trinkets
- White Embossing Powder
- TOOLS
- Paper Trimmer, Paper Snips
- Heat Tool
- Cut & Emboss Machine
CREATING THE PARTS
I think what makes this the perfect pansy is die-cutting it from the Expressions in Ink Designer Series paper. The smaller petal is die-cut from Basic White. Then using a Dauber or Blending Brush ink the edges of the petals with Polished Pink ink.
Die-cut the pieces of the blossom and stem from Basic White, Polished Pink, Evening Evergreen, and Soft Succulent. Use a light brush of Bumblebee ink on the blossom base.
Use Gold Foil Specialty Paper to die-cut the pansy ‘beard’. The pansy center is die-cut from Basic Black cardstock.
Die-cut the leaves from Evening Evergreen and Soft Succulent and assemble.
Cut a 1-1/2″ x 5-1/2″ strip of black & white dotted patterned paper from the Pattern Party DSP. Adhere to the right side of the card front. TIP: Use the Stamparatus to line up the edges. Just place the card in the corner of the Stamparatus and nudge the strip in place. Easy Peasy.
Die-cut the tall leaf stem from the Meadow dies and the Soft Succulent cardstock.
Stamp the sentiment in white ink and heat emboss with white embossing powder on Basic Black cardstock. Cut to size (approximately 5/8″ x 3″). Add Black Dimensionals behind sentiment strip.
ASSEMBLY TIME
Assemble the pieces as shown. Add some flicks from the Basic Black Marker brush end. Attach the Bumblebee Trinket with a couple Glue Dots.

OPTIONAL: Use the Basic Border dies to trim the card front and add a 3/4″ – 1″ strip of the black & white dotted pattern paper.
As always, add a personalized envelope.
I hope you liked the perfect pansy card. If you would like any of the products used in this week’s pansy projects, just click on the product in the Supply List at the end of this post.
I would be honored to become your Stampin’ Up! Demonstrator. And I thank you for supporting my business.


Absolutely perfect. ♥
Thanks. DSP really takes die-cuts up a notch.