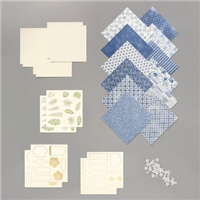
Hi Everyone? Thanks for being here. Today I am sharing another blue & white anniversary card that I made for my dear friends. I combined Night of Navy and Misty Moonlight with a little Boho Indigo patterned paper and am thrilled with how it turned out. Here is my card. (P.S. Did you add the Boho Indigo Product Medley to your shopping list? The refill is currently on backorder and is expected to be back in around July 20th. But the full product medley is available to ship today!)

I used Shimmery White to give the card a subtle shimmer.
- Shimmery White cardstock:
- 5-1/2″ x 8-1/2″ scored at 4-1/4″
- 4″ x 5-1/4″
- Night of Navy cardstock: 3″ x 4″ for large branch die-cut
- Misty Moonlight cardstock: 3″ x 4″ for large branch die-cut
- Boho Indigo DSP: 5-1/2″ x 4-1/4″
- White Linen Thread: about 20″ for a double bow
CREATE & ASSEMBLE
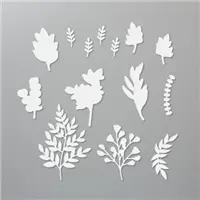
- Die-cut the large leaf branch from Night of Navy and Misty Moonlight. Use the Forever Flourishing dies (part of the super awesome Forever Fern Bundle – A MUST PURCHASE)
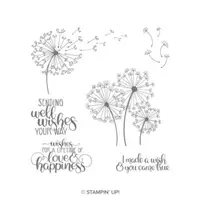
- Line-up sentiment from the Dandelion Wishes stamp set on the Stamparatus.
- Stamp the sentiment in Misty Moonlight ink. Then, without moving the stamp or paper, stamp the sentiment with Versamark ink.
- Heat emboss the sentiment with clear embossing powder.
- Attach die-cut leaf branches to the top of the card panel with liquid glue. TIP: Just dab some glue on the leaves from the top of the card panel and down about 1″. Then you will still get some nice movement from the leaves near the sentiment.
- Tie a double bow with the linen thread and attach it with a rolled glue dot.
- Add DSP Layer to the card base. TIP: Use your Stamparatus to line up the layers for perfect placement every time.


- Layer the panel with Dimensionals onto the Boho Indigo DSP.
- Add a strip of Boho Indigo DSP to the card insert. TIP: I cut 1/4″ and used Tear-n-Tape.
- Die-cut a vase and leaf from Boho Indigo DSP for the envelope. TIP: Always make sure that anything added to the outside of the envelope is completely glued down.
I love how this turned out. It is so fresh and simply elegant. I hope you enjoyed the blue & white anniversary card project. If you missed the anniversary/wedding card in yesterday’s post. Check it out here.
Let’s Get Super Excited
- You can order from my shop 24/7 or contact me anytime with questions.
- Leave me a comment. I’d love to hear from you.
- What did you like?
- What would you like to see more of?
- Need help implementing a technique? Ask me and I will see what I can do.
- HOST a WORKSHOP or CLASS? Contact me to get on the schedule. I will design a workshop based on your desires.
- JOIN MY TEAM Purchasing the $99 Starter Kit is one of the BEST DECISIONS EVER!
- Visit my PROJECT GALLERY for more paper crafting inspiration.
- Subscribe to PAPER PUMPKIN and get a different creative kit every month.
- SUBSCRIBE TO MY BLOG NOW!
- Ask me how to get your FREE catalog.
I CAN SHOW YOU HOW TO TAKE YOUR CARDMAKING & SCRAPBOOKING TO THE NEXT LEVEL.