I can’t get enough butterflies. I was lucky enough to score some limited-release Butterfly Bijou Designer Series paper and used the fabulous Butterfly Brilliance dies to cut out the butterflies. The result is that I have a huge pile of butterflies to add to projects.
FACTOID
Have you ever wondered why these little creatures are called butterflies? Maybe because of the color of their excrement. Goolge said that the Old Dutch had the term “boterschijte”, which literally means “butter $#!t”. When butterflies metamorphose, their first poop upon emerging from the chrysalis, called “meconium”, is brightly coloured, often yellow or orange. Like butter. Hmmm. That definitely makes you think.
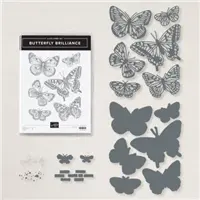
Here is the Butterfly Brilliance bundle. It was an early release bundle that will be included in the Stampin’ Up! 2021-2022 Annual catalog which will be available in May. ** If you place an order of $50 or more with me, I will send you a catalog FREE. It is full of color and cheerful stamp sets. **

I wanted to create a layered elegant looking butterfly card. Here are my 2 cards.


Let me show you how easy it is to make these cards.
MEASUREMENTS & SUPPLIES
- Paper
- Card Base – 4*1/4″ x 11″ scored at 5-1/2″
- Shimmery White
- Soft Sky or Seaside Spray or Pool Party
- Copper Foil (or Brass or Gold): 3-3/4″ x 5″
- Basic White cardstock: 3-1/2″ x 4-3/4″
- Card Base – 4*1/4″ x 11″ scored at 5-1/2″
- Stamp Sets
- Butterfly Brilliance
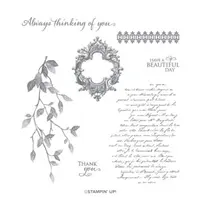
- Very Versailles
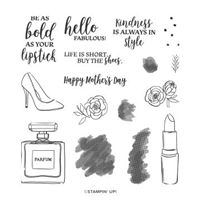
- Dressed to Impress (Mother’s Day sentiment)
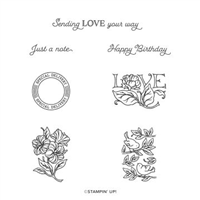
- Posted For You (‘Special Delivery’ sentiment)
- Dies & Punches
- Brilliant Wings dies
- All Dressed Up dies
- Inks & Markers
- gold ink
- ALTERNATIVE: Versamark & gold embossing
- Other Supplies
- gold embossing powder
- silver embossing powder
- Fine Art ribbon
- Champagne Rhinestones
- Gold Glitter Enamel Dots
- Baker’s twine with metallic thread
- ALTERNATIVE: Rose Gold or Copper Metallic thread
- Subtle 3D embossing folder
- Dimensionals
- Tear n Tape
- Multipurpose Liquid Glue
- Tools
- Snips
- heat tool
- Stampin’ Cut & Emboss machine
- Paper Trimmer
CREATING PIECES & PARTS
Let’s get the background done first. Ink the Very Versailles script stamp with gold ink. I used the retired gold Delicata ink. It is the best gold ink on the face of this earth IMHO. Keep in mind that you want to stamp in a triangle and leave some white space. Check out this post to learn more about the Rule of Thirds.
Add a 2″ piece of Tear n Tape to the stamped panel a little below the halfway point (see photo). Cut a 4″ piece of Fine Art ribbon. Cut off the long edge of the ribbon and fray before adding to the Tear n Tape. Ripple the ribbon for soft dimension.

Strip the metallic thread from the baker’s twine. It is really curly. I cut lengths and loop them. Then attach the loops to the back of the butterfly. Add Dimensionals and adhere to stamped card panel over the ribbon.


The silver embossed ‘Special Delivery’ circle is from the Posted For You stamp set. This card looks just as good without this element. OPTIONAL: A vellum circle would look nice.
Layer with the foil and add to the card base. TIP: Try embossing the colored cardstock with the Subtle 3D embossing folder for a linen look.
Add some Champagne Rhinestones and Gold Glitter Enamel Dots. Personalize a message insert and the envelope for that extra elegance. If you don’t have any butterflies, try this layout/design with a dragonfly.

Now, I know that you need stamping supplies and I would be very happy to be your Demonstrator. Just click on the SHOP 24/7 button under my signature to go directly to my online store. Or you can drop me an email if you have any questions.


Beautiful cards. Love all the details, especially the pretty butterflies. Thanks for sharing.
Thank you.
Stunning cards. Absolutely beautiful. Thank you for the inspiration and the detailed instructions.
Thank you very much for your kind comment. I am so glad that you are inspired.
Love this card and will CASE this one. Love the butterfly set.
Thank you. The best compliment is that you will CASE the project. Have fun!
Stunning as always! Love that you used multiple stamp sets to achieve the perfect design aesthetic. Another well of inspiration; thank you!
This well is deep. Thank you for your wonderfully kind comment, as always.
What a wonderfully detailed post, Mary! This card is stunningly gorgeous!
Thank you. I am glad that you like the cards and post.
Your cards are beautiful. The instructions are very helpful. Thank you for sharing this.
I am thrilled that you find the instructions helpful. Thank you for your kind comment.
Such beautiful cards!!! You are just full of interesting information!
Hey sista, Thanks for the kind comment. It’s me and my friend Google with fun factoids.
I really like your cards.
Thank you, Donata. I hope that you CASE them and enjoy.