On Tuesday I shared my Colorful Seasons and Artisan Texture card inspired by the pile of leaves in my driveway. If you missed that post you can check it out HERE. I had some extra leaves so I made a couple more cards. Here are the cards using the Colorful Seasons Leaves.
 (2)")
 (1)")
I have been pulling out my Designer Series Papers (DSP) and looking at the backsides. I remember having a record player and albums. Do you remember the flip side of a 45? Those songs that did not seem to make the radio station playlists very often. It seems like DSP is similar. The background for this card is from the Woven Threads Designer Series Paper. I added some raised brick embossing paste and then stamped some script from the Very Versailles stamp set before adding my leaves.
MEASUREMENTS (Supplies and Links are at the end)
- Very Vanilla Thick Cardstock: 4-1/4″ x 11″ scored at 5-1/2″
- Woven Threads DSP: 3-3/4″ x 5″ plus extra for sentiment
- Tranquil Tide Cardstock: 4″ x 5-1/4″
- Previous Project: Gold Foil Designer Paper: 1/2″ x 3-3/4″ plus enough to die-cut leaves
- Previous Project: Watercolor paper and Thick Very Vanilla or Thick Whisper White for leaves
ASSEMBLY (use any die-cutting and embossing machine)
- Gather your extra leaves from our project on October 29, 2019.
- Mix embossing paste with Early Expresso reinker. Spread randomly through the Brick Mask over the Woven Threads card front. Let dry (about 3 minutes).
- Using the Stamparatus, set up script stamp from Very Versailles stamp set. Adjust the embossed card layer in Stamparatus and stamp it randomly. You can use an acrylic block for this step. If you are particular about having a straight script, then using a Stamparatus will take the guesswork out of stamping straight.
- Create the layers:
On Card 1:
- Spread out the Copper Trim to a give it a ‘net’ effect and adhere to the card front. I use a bit of transparent tape on the backside.
- Stamp the sentiment from Bloom & Grow stamp set with Copper Metallic Ink on Woven Threads DSP after wiping down with Embossing Buddy. Cover stamped image with Copper Stampin’ Emboss Powder, flick to remove excess and set with a Heat Tool. Trim and attach with Stampin’ Dimensionals.Why do I use Copper Metallic Ink and not Versamark? Because I think it gives the stamped image more depth.
- Add 3 leaves with Dimensionals over Copper Trim.
- I had a wood embellishment leaf so I just added it.
On Card 2:
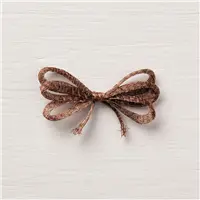
- Create a leaf cluster and adhere to the center of the card. I had a leftover Paper Pumpkin feather embellishment so I added.
- Loop Copper Metallic Thread around 3 fingers, 3 times and attach thread cluster to back of leaf cluster. It is also possible to wrap a glue dot at the base of the thread cluster and use a tweezer to place it where you want after the card is complete.
- Tie a bow with the Copper Trim and pull it into shape to give the bow a ‘full’ effect.
- Add some gold glitter enamel dots.
5. Assemble card. I used Tranquil Tide cardstock because it made the colors pop. Don’t be afraid to use whatever color pleases you. Have fun with this. Use up those Paper Pumpkin embellishments.
Are you seeing a trend? I love Paper Pumpkin for many things. One of those is the variety of embellishments that come with each monthly kit. There is always more than is needed for the projects. If you are a current Paper Pumpkin Subscriber, PLEASE, PLEASE, open your boxes and use those stamp sets and embellishments. Want to learn more about Paper Pumpkin? Check it out HERE.
Placing an order today? If you are placing an order for $150 or more, I want you to enjoy all of the Host Rewards you have earned. If your order is less than $150, Please add the Host Code for the month when prompted. I use the accumulated Stampin’ Rewards to purchase gifts for my customers and team.
Thank you! If you do not currently have a Stampin’ Up! Demonstrator, I would love to work with you. Contact me.
Do Something Creative Every Day,


Absolutely love this!!!
Glad you like it 🙂
Such a great technique! The effect is gorgeous! I love how your blog is like a class each and every day. ♥
My goal is to share and inspire. If there is a lesson along the way, awesome! Thanks for stopping in.