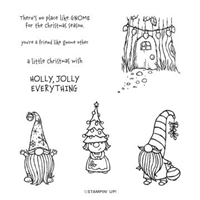
Today we are going to have more fun with Stampin’ Up! GNOEL Gnomes. I know, it’s corny. The ‘G’ is silent like the ‘G’ in gnomes, gnu, gnash, and gnat. Thank you for still reading this post. There is still so much love in the Gnome for the Holidays stamp set. I try to put it away and those gnomes just drag me back.

Isn’t this card adorable? There is a lot of texture. Does this card seem too difficult for the beginner stamper? I have faith that a beginner can tackle this card. It’s like eating an elephant, you can do this ‘one bite at a time’. Let’s begin.
- Thick Whisper White cardstock:
- 4-1/4 ” x 11″ scored at 5-1/2″ for the card base
- 2-1/2″ x 4″ for gnome stamping
- Whisper White cardstock: 4″ x 5-1/4″ for message insert
- Real Red cardstock:
- 2-3/4″: x 5-1/2″ for card panel frame
- 1-1/4″ x 4-1/4″ for letters
- Foam Sheet: 1-1/4″ x 4-1/4″
- Heartwarming Hugs DSP:
- 2-1/2″ x 5-1/2″ for card panel
- OPTIONAL: 2-1/2″ x 6″ for envelope flap
- Mossy Meadow cardstock:
- 2-1/2″ x 5″ for banner frame
- 1-3/8″ x 4-1/4″
- Pear Pizzazz cardstock: 1-1/8″ x 4-1/4″ for banner
Stamp the Good Morning Magnolia image onto the vellum panel using Basic Gray ink. The lines will be blurred by the Stampin’ Blends and the alcohol to create a faux watercolor effect.
Color the image starting with the lightest color. Use Dark Daffodil Delight for the center. Dip a fine-tip paintbrush into the rubbing alcohol and gently move the color. I added Champagne Shimmer Paint to my rubbing alcohol.
Next, color non-adjacent petals with Dark Flirty Flamingo. Gently blur the stamped line. Let dry and repeat on other petals. Do the same for the leaves. TIP: Blow into a straw to gently direct the ink flow in the desired direction.
Add a second layer of color after the image is dry. Repeat the process of alcohol painting and gently blowing the ink.
OPTIONAL: Pick up some clean rubbing alcohol with the paintbrush and flick it over the image. This will create small droplets that will lighten some areas by moving the color outward.
Adhere the vellum panel to the Basic White cardstock panel using Stampin’ Seal or a light amount of Multipurpose Liquid Glue. Add to Basic Black card base.
Stamp the sentiment in White Craft ink and heat emboss with with embossing powder. Trim to you liking. Add to card panel with small black Dimensionals.
Customize the message insert and the envelope with some flicks of color from the brush end of the Stampin’ Blends.
Card Base Embossing
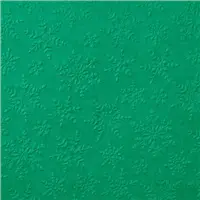
Use the Winter Snow embossing folder to emboss the front of the card base. Open up the card base. Slide the front of the card into the embossing folder. Line up the card with the top edge (crease side) hanging out. At this point, half of the card is hanging outside of the embossing folder. Run through the Stampin’ Cut and Emboss machine. All the instructions for the ‘sandwiches’ are on the base plate with pictures.
Banner
- Emboss the Pear Pizzazz strip with Winter Snow embossing folder.
- Layer embossed Pear Pizzazz strip onto the Mossy Meadow strip.
- Using the Triple Banner punch, fishtail both ends. HINT: Line up the outer edges as shown.

Sentiment
- Layer the Real Red strip on the Foam Adhesive strip. Both sides are sticky. Only remove one side.
- Using the Playful Alphabet dies, die-cut the letters from the layered strip.
- Congratulation! You have just made an awesome dimensional sticker! I love this part.
- Adhere the letters to the banner. TIP: There is not much room, so start close to the left edge and put the letters close.
- Take a couple of loops of red twine and adhere to both ends of the banner. TIP: I use several glue dots or lines of Stampin’ Seal +. The red twine is from the retired Country Club twine bundle.

Gnomes
- Stamp gnomes from Gnome for the Holidays stamps set using Memento Tuxedo Black ink.
- Color with Real Red (dark) and Mossy Meadow (light) Stampin’ Blends.
- Fussy cut gnomes.
Gnome Panel
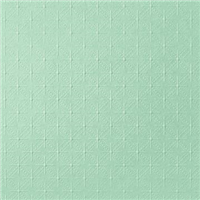
- Emboss Real Red strip with Dainty Diamonds embossing folder.
- Punch 1-1/2″ circle on top and bottom of Heartwarming DSP.
- Punch (2) 1-1/2″ circles from Mossy Meadow strip. Leave room for die-cutting the 1-7/8″ stitched frame.
- Die-cut (2) stitched frames (using 2nd smallest circle) around the circle punched in the Mossy Meadow strip.
- Layer Stitched Circle frame over the punched circle in DSP as shown.


ASSEMBLY
- Arrange gnomes peeking out of the circle windows and adhere to the DSP with Multipurpose Liquid Glue.
- Trim any gnome parts hanging outside the boundaries.
- Adhere the gnome/DSP panel onto the embossed Real Red panel.
- Layer the gnome strip onto the center of the embossed card base.
- Adhere the sentiment banner between the ‘windows’.
- And finally, customize your message insert and envelope. Use DSP, stamping, embossing, or some die-cuts.
Did it help to have this card broken into smaller bites? Even the most complicated design can be broken down.
I hope that I have made the instructions easy to follow. I would love to see your gnome cards. This card would be wonderful without the embossing too.
TOOLS FOR SUCCESSFUL PAPER CRAFTING
How do you go from timid beginner to avid paper crafter? I think it is the tools. The key is to get to know your tools. Take time to practice. Here are my absolute favorites.
- Paper Snips by Stampin’ Up! are the best ever for fussy cutting. If you do not have them, GET THEM NOW!
- Paper Trimmer is an absolute must for cutting and scoring. Practice cutting and measuring. Learn where you need to put the paper to get that perfect cut. Using the measuring lines takes some practice. I line up the paper just on the line (so I can’t see the line) and it seems to work perfectly for me. I wear glasses, I have a lazy eye and I am far-sighted. And my glasses are usually dirty. Lots to deal with here. Practice, Practice, Practice.
- Stampin’ Cut & Emboss Machine. It is a must for taking your paper crafting to the next level with embossing and die-cutting.
- Heat Tool and embossing powders.
If you don’t have all the supplies, you are free to go to my shop 24/7 and order. I also encourage you to look at your current inventory and find something you already own to try this card layout.
Come back tomorrow for the Pals Blog Hop. This month’s theme is “Tag, You’re It” – tags or 3D projects to get you inspired for the upcoming gift season. And yes, before you ask, I have at least one gnome tag (think ‘cookies’).
Let’s Get Super Excited
- You can order from my shop 24/7 or contact me anytime with questions.
- Leave me a comment. I’d love to hear from you.
- What did you like?
- What would you like to see more of?
- Need help implementing a technique? Ask me and I will see what I can do.
- HOST a WORKSHOP or CLASS? Contact me to get on the schedule. I will design a workshop based on your desires.
- JOIN MY TEAM Purchasing the $99 Starter Kit is one of the BEST DECISIONS EVER!
- Visit my PROJECT GALLERY for more paper crafting inspiration.
- Subscribe to PAPER PUMPKIN and get a different creative kit every month.
- SUBSCRIBE TO MY BLOG NOW!
- Ask me how to get your FREE catalog.
I CAN SHOW YOU HOW TO TAKE YOUR CARDMAKING & SCRAPBOOKING TO THE NEXT LEVEL.


Gotta love a gnome project and yours is so original and clever! Thanks bunches for sharing it with the rest of us. It’s going to make a lot of people happy this holiday season 😀
Makes me happy just knowing that you enjoyed my card and instructions. Thank you so very much. 🙂
beautiful……lots of work, but so worth it, IF the right person receives this!
You are so right. I curate my cards for the recipient. And the joy when they receive them is worth the effort.
Omgosh! So clever & cute!! Absolutely love!
Those pesky little gnomes are fun to create with. Thank you!
Adorable card! Just love “GNOEL”!
Thank you so much for your kind comment. Play on words was fun.
Adorable and clever!
Thank you. It is fun to use layouts from the past and design with new twists.
I love this card, so adorable. I am a big fan of the whimsical stamps. Thank you for the step by step instructions.
Thank you and you are welcome for the instructions. 🙂
SOOOOOO cute! Great explanation for the circle cut outs, too. Now, what do you have planned for your gnomies for Valentine’s Day? Easter? Flag Day????
Sadly, the gnomes might not make it into the new year. There is a mutiny brewing from the other 100 stamp sets. LOL! But…if we can reach a consensus, the gnomes may concede to more pairings with the masses.
Love all the fun you’re having with the gnomes, GNOEL is the best!
You are a super creative stamper.
Thank you and YES, I am having a gnomerific time with the Gnome for the Holidays stamp set.