Oh JOY! I need to share with you a couple of tricks for using the Blossoms in Bloom dies. To do this, I created a card using lots of color contrast. I was inspired by some blacklight photos that I saw recently. So here is my card Blossoms in Bloom – Color Contrast.

And here is the 2nd card I made 
The best part about these cards is — NO GLUE — you heard that right. I used the NEW Adhesive Sheets. Clean hands. Hallelujah!
MEASUREMENTS (Supplies and Links are at the end)
- Basic Black Cardstock: 4-1/4″ x 11″ scored at 5-1/2″
- Basic Black Cardstock: 4″ x 5-1/4″ (Card #1) 3-3/4″ x 5″ (Card #2)
- Flirty Flamingo Cardstock
- Daffodil Delight Cardstock
- Grapefruit Grove Cardstock
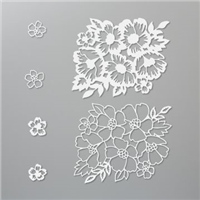
PIECES AND PARTS (use any die-cutting and embossing machine)
CUT MULTI-LAYERED DIES:
- Apply cardstock to Adhesive Sheet. HINT: Adhesive Sheet is 6″ x 12″. You need about 4-1/4″ x 5″ for the die. I just used scraps and worked it out from there. LOL!
- Die-cut the thin frame from various bright cardstock colors.
- Flip die-cut over and apply Press’n Seal to the backside. Burnish it against the cardstock so that all pieces stick.
- Turn die-cut over and gently peel the die off the font of the cardstock.
")
")
")
COLOR AND PAPER PIECE FOCAL: (Do not remove adhesive until you are ready to apply the die-cut to the project)
- Add die-cut outline to Basic Black cardstock.
- Color with Watercolor Pencils. TIP: I colored using straight lines then went back and used small circular coloring to soften edges.
- OPTIONAL: Add paper piecing with liquid glue.
- OPTIONAL: Cut across image diagonally to get 2 cards. HINT: I did this because I decided I did not like the paper piecing. I did not have full petals on one side, so I cut them off!
")
")
PREPARE THE SENTIMENT:
- Stamp sentiment on cardstock (about 7″ x 1/2″) with Memento Tuxedo Black ink and heat emboss with clear embossing powder.
ASSEMBLY
- Layer as shown. I used Dimensional behind the card front.
- Grab a Whisper White envelope and add some of the extra outline pieces.
- Stamp your message on a piece of 4″ x 5-1/4″ Whisper White or coordinating cardstock for the inside of the card.
If you enjoyed this post, please be sure to…
- Leave me a comment. I’d love to hear from you. What did you like and what would you like to see more of?
- Please use this month’s host code on orders under $150! Orders of $75 or more will receive a free gift from me!
- Shop the LAST CHANCE PRODUCTS before they are GONE!
- Stampin’ Blends will be sold as Combo packs only in 20-21 catalog
- Snail adhesive is being replaced by an easier to use ‘dot-type’ adhesive in two strengths
- Aqua Painters will be sold in a 3 pack – to include a broad brush
- Shop the Clearance Rack with discounts of up to 60%!
- Read my Reasons to Join and why purchasing the $99 Starter Kit is the best decision ever!
- Visit my project gallery for more paper crafting inspiration!
- Learn more about Paper Pumpkin.
- Don’t miss a blog post. Subscribe to my BLOG NOW!
- GET YOUR 2020-2021 ANNUAL CATALOG PAPER, RIBBON AND/OR DSP SWATCH BOOK


More works of art! Just stunning. ❤️
And they are easy and FUN! Adhesive sheets and Press’n Seal are the key
Amazing! Just amazing!
Thanks! 🙂