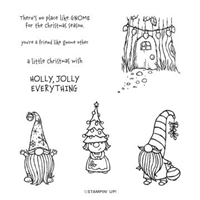
Another gnome card for my Gnomies! Here is a quick gnome Christmas card. The Snowflake Splendor Designer Series Paper(DSP) is the perfect background for this little gnome. Snowflakes and a watercolor effect really set the stage for this happy gnome.

Isn’t that guy the cutest? And oh so easy to watercolor. I have included tips for cutting and stamping for multiple cards at the end of these instructions.
- Thick Whisper White cardstock: 4-1/4″ x 11″ scored at 5-1/2″
- Snowflake Splendor DSP:
- 3″ x 4-1/4″ for panel
- 2-1/4″ x 6″ for envelope flap (will be trimmed)
- Misty Moonlight cardstock: 3-3/8″ x 4-5/8″
- Basic Black cardstock: 1/2″ x 4-1/4″
- Fluid 100 Watercolor paper: 1-1/2″ x 2-1/2″ OR a full sheet and stamp 10 gnomes (more is better!!!)
- Glimmer Paper or Snowflake sequins
Stamp the Good Morning Magnolia image onto the vellum panel using Basic Gray ink. The lines will be blurred by the Stampin’ Blends and the alcohol to create a faux watercolor effect.
Color the image starting with the lightest color. Use Dark Daffodil Delight for the center. Dip a fine-tip paintbrush into the rubbing alcohol and gently move the color. I added Champagne Shimmer Paint to my rubbing alcohol.
Next, color non-adjacent petals with Dark Flirty Flamingo. Gently blur the stamped line. Let dry and repeat on other petals. Do the same for the leaves. TIP: Blow into a straw to gently direct the ink flow in the desired direction.
Add a second layer of color after the image is dry. Repeat the process of alcohol painting and gently blowing the ink.
OPTIONAL: Pick up some clean rubbing alcohol with the paintbrush and flick it over the image. This will create small droplets that will lighten some areas by moving the color outward.
Adhere the vellum panel to the Basic White cardstock panel using Stampin’ Seal or a light amount of Multipurpose Liquid Glue. Add to Basic Black card base.
Stamp the sentiment in White Craft ink and heat emboss with with embossing powder. Trim to you liking. Add to card panel with small black Dimensionals.
Customize the message insert and the envelope with some flicks of color from the brush end of the Stampin’ Blends.
GNOME
- Stamp the gnome on Fluid 100 Watercolor paper with Memento Tuxedo Black ink.
- Using the fine-tipped Water Painter add color to the gnome.
- Balmy Blue for the hat and Basic Gray for the shoes and bell
- Very light Basic Gray watercolor to the beard
- Blushing Bride for nose
- Fussy cut leaving a thin white border.
SENTIMENT
- Stamp the sentiment ‘CHRISTMAS WISHES’ using White Craft Ink on Basic Black strip.
- Heat emboss with white embossing powder.
- Place diagonally across the DSP panel and trim edges.
ASSEMBLY
- Layer the DSP panel as shown.
- Use Dimensionals behind the gnome.
- Add a die-cut snowflake or adhesive-backed snowflakes. I used the snowflake die-cut from the retired Colorful Seasons dies.

OPTIONAL: MAKING MULTIPLES
If you are interested in making multiples of this card, here are some cutting and stamping tips to get the most out of your supplies.

- Trim DSP at 4-1/4″ twice as shown
- Then trim the 4-1/4″ pieces to 3″ with final size being 3″ x 4-1/4″
- Trim remaining 3-1/2″ x 12″ piece to 3″ x 12″ (save remaining 1/2″ for another project)
- Then trim the 3″ x 12″ piece into 3″ x 4-1/4″ with 3″ x 3-1/2″ remaining for another project)

- Use a clear block to stamp gnome images
- Memento Tuxedo Black if watercoloring
- Basic Gray if coloring with Stampin’ Blends
- Fussy cut images leaving a little white border TIP: Use sharp Paper Snips and move the paper while cutting. Go slow all the way around the image in the same direction.

- Cut 4-14″ x 1/2″ strips
- Line up sentiment on Stamparatus plate
- Position strip with sentiment to the right of center
- Add thick washi tape to mark edges for lining up strips TIP: I use the thicker glimmer washi tape because the cardstock does not ‘slip’ over the tape.
- Stamp and heat emboss TIP: I do one at a time so that the craft ink does not dry. Embossing powder will not stick to dry ink.
THERE ARE ONLY 4 DAYS LEFT FOR THE BONUS $5 DEAL!
Let’s Get Super Excited
- You can order from my shop 24/7 or contact me anytime with questions.
- Leave me a comment. I’d love to hear from you.
- What did you like?
- What would you like to see more of?
- Need help implementing a technique? Ask me and I will see what I can do.
- HOST a WORKSHOP or CLASS? Contact me to get on the schedule. I will design a workshop based on your desires.
- JOIN MY TEAM Purchasing the $99 Starter Kit is one of the BEST DECISIONS EVER!
- Visit my PROJECT GALLERY for more paper crafting inspiration.
- Subscribe to PAPER PUMPKIN and get a different creative kit every month.
- SUBSCRIBE TO MY BLOG NOW!
- Ask me how to get your FREE catalog.
I CAN SHOW YOU HOW TO TAKE YOUR CARDMAKING & SCRAPBOOKING TO THE NEXT LEVEL.


Absolutely adorable! Really loving your gnomes:-) Do you have good luck stamping in Memento and then water coloring? I usually use Stazon when I watercolor (which isn’t very often)
I am a very light touch watercolorer (is that even a word?). If I am going to use a lot of water then I do use Stazon. I wanted the lines to blur a little here so Memento was my best option.
Thank you! I’ll give it a try!
🙂