Welcome to the Scrapbook Page Blog Hop. This month is for Birthday Celebration scrapbook pages.
What is a celebration? According to the dictionary, a celebration is an action of marking one’s pleasure at an important event or occasion by engaging in enjoyable, typically social, activity. Celebrations actually boost our well-being — and this is true for major milestones and daily wins alike. One of the main reasons celebrating is so important is because it reflects an overall attitude of gratitude. Enjoy what we have, instead of focusing on what we don’t have or only on what we want in the future.
So, with that in mind, I have created a couple of birthday celebration 8″ x 8″ scrapbook pages. I will include the list of Stampin’ Up! products, some measurements, and a brief description of the techniques used.
BIRTHDAY GIRL (4″ x 4″ photo)

Supplies & Measurements
- 8″ x 8″ Thick Whisper White cardstock
- 4-1/4″ x 4-1/4″ each of Granny Apple Green and Magenta Madness cardstock
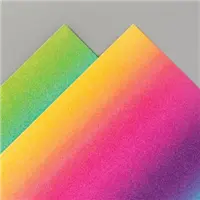
- Rainbow Glimmer Paper
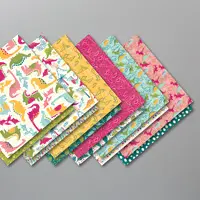
- Artistry in Bloom Designer Series Paper
- coordinating Bakers Twine
- Decorative Mask, Ink & Blending tool
- Daffodil Delight, Mango Melody, Magenta Madness, Gorgeous Grape, Bermuda Bay, and Granny Apple Green
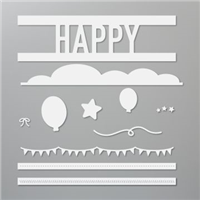
- Playful Alphabet dies
- Happy dies
Techniques
- Tape your mask to the center of the 8″ x 8″ page using a safe-release painter’s tape.
- Use the blending tool to add colors from the Daffodil Delight to the Granny Apply Green.
- Die-cut letters from Rainbow Glimmer Paper.
- Balloons are die-cut from the Artistry in Bloom DSP and the Glimmer Paper. Add some Dimensionals behind some of the balloons.
- Tuck bakers twine under balloons and add some bows. Tie the strings together near the ends.
- Cut the 4-14″ squares in half diagonally and add a 3″ x 3″ piece of scrap to the back to piece them together to form a frame.
- Add photo.
BIRTHDAY BOY 4″ x 4″ PHOTO

Supplies & Measurements
- 8″ x 8″ Pool Party cardstock
- 4-1/4″ x 4-1/4″ Dinoroar Designer Series Paper (retired)
- 4-5/8″ x 4-5/8″ Old Olive cardstock
- Dinoroar Designer Series Paper (retired)
- Cardstock scraps: Pretty Peacock, Lovely Lipstick (retired), and Crushed Curry
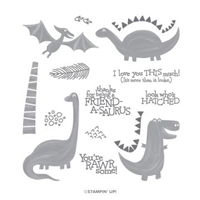
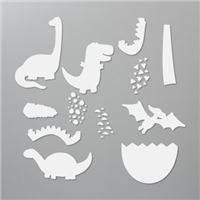
- Dino Days stamp set and Dino dies
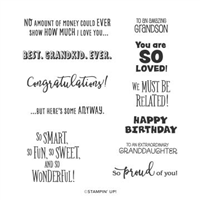
- A Grand Kid stamp set
- Dinoroar Enamel Shapes (retired)
- Stitched Triangles dies
- Inks: Pretty Peacock, White Craft Ink
- White embossing powder
Techniques
- Layer 4-1/4″ and 4-5/8″ frames and place in the center of the page.
- Die-cut dinosaurs from Designer Series Paper and add ‘stegs’ as shown.
- Add stamped fronds and dots as shown behind dinosaurs.
- Heat emboss the sentiment from A Grand Kid stamp set and cut apart. I generally have to stamp 2 sets of sentiments to get the borders to come out even when cutting apart.
- Die-cut pennant strings from Stitched Triangles die.
- Add Dimensionals behind some dinosaurs and sentiment pieces.
- Tuck in some enamel element.
- Add photo.
I hope you enjoyed my Birthday Celebration scrapbook pages and will hop over to see what Lisa Padgett at Crafting Hugs has for you.
We would love for you to create a scrapbook page using Stampin’ Up! products and hop with us next month. Our theme for September is ‘School Day’. There are so many possibilities here. These can be past normal in a classroom or today in a virtual classroom.