Today we wrap up the week with a single timeless tulip on a laser-cut notecard. Tulips and Daffodils are the flowers that come to mind when spring is in the air. I was inspired to create this card by the very talented Debra Burgin. It was quick to put together and I can’t help smile when I see it. My bestest buddy, Di, from Vermont was here for a long weekend and we spent an entire day creating. I am so lucky.
“It was one of those March days when the sun shines hot and the wind blows cold. When it is summer in the light and winter in the shade.” Charles Dickens, Great Expectations.
On with today’s project.

MEASUREMENTS (Supplies and Links are at the end)
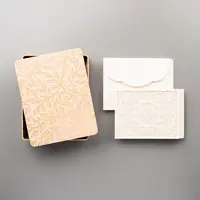
- Bird Ballad Laser-cut notecard and envelope
- Shimmery White Cardstock: 3″ x 5″ to die-cut
- Thick Whisper White or Pear Pizzazz Cardstock: to punch leaves
- Grapefruit Grove Cardstock: 4-1/8″ x 5-3/8″ plus scrap to punch tulip
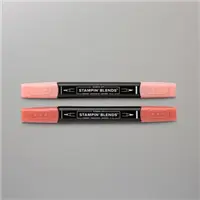
- Whisper White Crinkle Ribbon: about 12″ colored with Stampin’ Blends
- Vellum scraps for butterfly
CREATING THE PIECES AND PARTS (use any die-cutting and embossing machine)
- Die-cut the Stitched Nested panel from Shimmery White.
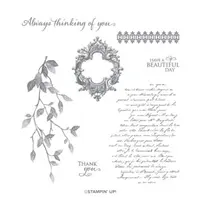
- Stamp the words from Very Versailles in Crumb Cake ink on the stitched panel.
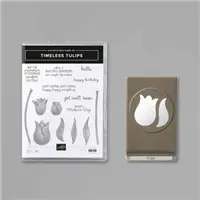
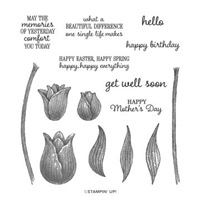
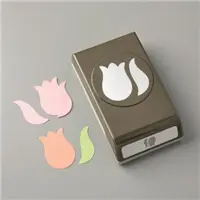
- Stamp the tulip and punch. TIP: We got into tulip mode and stamped and punched several colors of tulips to use on future projects.
- Stamp the leaves and punch or fussy cut.
- Stamp the stem onto the stitched panel.
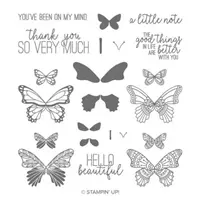
- Use a small embossed butterfly from your stash or stamp the small butterfly from Butterfly Gala in White Craft Ink and heat emboss with white embossing powder. TIP: I have several of these little butterflies ready to go. I keep them in a clear envelope with the stamp set.
- Color the crinkle ribbon with the Stampin’ Blend that coordinates with your tulip.
ASSEMBLE CARD
- Sponge Multi-Purpose Liquid glue around the edges of the notecard for the back panel of colored cardstock. TIP: Use the embossing buddy over the panel front and back after the glue dries to remove the stickiness.
- Layer elements onto the stitched panel as it pleases you.
- Tie the ribbon around the panel.
- Add Dimensionals behind the stitched panel and layer on the laser-cut notecard.
- Attach vellum embossed butterfly with a rolled-up glue dot in the center.
- Add clear epoxy dots as shown.
")
")
- Grab a coordinating envelope from the tin and add some decorative stamping. stenciling or cut some coordinating DSP for the envelope flap.
- Don’t forget to make an inside panel for your message. Cut a 4″ x 5-1/4″ panel, stamp a sentiment and adhere to the inside of the card.
DiAnne’s Card:

I love the contrast of the orange, yellow and navy.
JOIN STAMPIN’ UP! TODAY
During Sale-a-bration there are super incentives for JOINING Stampin’ UP! as a demonstrator. I would love for you to be part of my team. Join between January 3rd – March 31, 2020, and in addition to the usual Starter Kit $125 worth of products for just $99, you will get a new exclusive Mini Paper Cutter (6″ guillotine), 6″ x 6″ Designer Series Paper sampler, and your choice of any stamp set offered in the current catalogs. And we will throw in some business supplies. AND you will get FREE SHIPPING. All this for $99. Sound like a great idea to you? Make a list and contact me. I will help you get the MOST for your $$. AND that’s not all, you get at least 20% off on all your future orders. BEST DECISION EVER!
Placing an order today? If you are placing an order for $150 or more, I want you to enjoy all of the Host Rewards you have earned. If your order is less than $150, Please add the Host Code for the month when prompted. I use the accumulated Stampin’ Rewards to purchase gifts for my customers and team.
If you do not currently have a Stampin’ Up! Demonstrator, I would love to work with you. Contact me.
Do Something Creative Every Day,


Love the laser-cut background for your card and DiAnne’s. (Can’t believe I have resisted getting that tin…!) Amazing how a color shift can change the entire feel of the card, too. ?
I can relate. That tin of laser-cut cards sat on my shelf for 3 months and now I can’t put it away.