Hello Gnomies! I have been busy playing with some of my new stamps and dies. The August-December 2020 Mini Catalog is stuffed with great ideas and products. And as always they coordinate so well with the products in the 2020-2021 Annual Catalog.
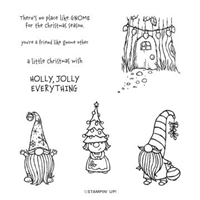
The top of my list is the Gnome for the Holidays stamp set. There are 3 cute little gnomes, a gnome tree stump, and several ‘gnomie’ phrases.
FACTOID: Gnome is a mythological creature from Scandinavian folklore, also known as a tomte or nisse. Gnomes make the most thoughtful Christmas gift ever. They are solitary, mischievous domestic spirits and live in the house (or garden – LOL!), and secretly act as guardians to protect the farmstead and animals from evil and misfortune day and night!
One of my favorite cartoons to watch with the kids was The World of David the Gnome. I think there was only one season. There were lots of life lessons for all of us in that show. More on my obsession with gnomes as the week progresses… LOL!
You can order from the mini-catalog on August 4, 2020 or TODAY by JOINING Stampin’ Up! and becoming part of the Murray Stamps TEAM.
When playing with the gnomes, I had fun stamping and coloring them with different techniques. Today I am sharing my Woodland Gnome. Here he is wandering through the pines.

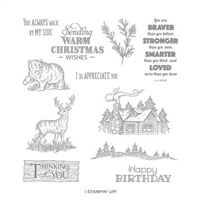
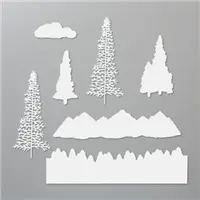
See how I incorporated the Rustic Retreat stamp set for the sentiment, the Birch background stamp and the die-cuts from Mountain Air bundle? I have the instructions all written out for you.
- Soft Suede cardstock: 4-1/4″ x 11″ scored at 5-1/2″
- Crumb Cake cardstock:
- 3-1/2″ x 4-3/4″ for card panel
- 3-1/2″ x 3/1/2″ for stamping gnome and sentiment
- Very Vanilla cardstock: 4″ x 5-1/4″ for message insert
- Mossy Meadow cardstock: 6″ x 4″ for die-cutting pines
- Cherry Cobbler cardstock: 3-5/8″ x 4-7/8″
Stamp the Good Morning Magnolia image onto the vellum panel using Basic Gray ink. The lines will be blurred by the Stampin’ Blends and the alcohol to create a faux watercolor effect.
Color the image starting with the lightest color. Use Dark Daffodil Delight for the center. Dip a fine-tip paintbrush into the rubbing alcohol and gently move the color. I added Champagne Shimmer Paint to my rubbing alcohol.
Next, color non-adjacent petals with Dark Flirty Flamingo. Gently blur the stamped line. Let dry and repeat on other petals. Do the same for the leaves. TIP: Blow into a straw to gently direct the ink flow in the desired direction.
Add a second layer of color after the image is dry. Repeat the process of alcohol painting and gently blowing the ink.
OPTIONAL: Pick up some clean rubbing alcohol with the paintbrush and flick it over the image. This will create small droplets that will lighten some areas by moving the color outward.
Adhere the vellum panel to the Basic White cardstock panel using Stampin’ Seal or a light amount of Multipurpose Liquid Glue. Add to Basic Black card base.
Stamp the sentiment in White Craft ink and heat emboss with with embossing powder. Trim to you liking. Add to card panel with small black Dimensionals.
Customize the message insert and the envelope with some flicks of color from the brush end of the Stampin’ Blends.
BACKGROUND
- Stamp Birch background on Crumb Cake cardstock using Early Espresso ink.
- Dip sponge wedge (or brush – link to the brushes I use are at the bottom of the supply lists) into Mossy Meadow ink and make a circle in the center of the Birch stamped panel. TIP: Use a light touch in a circular pattern radiating out from the center. It might work better for you if you lightly rubbed some of the ink off onto scrap cardstock (Mossy Meadow cardstock that will be used for die-cutting pines would be perfect) before adding to your project.
I rub ink off onto cardstock so that I can use the ‘inked’ piece for other projects, or the pines in the next step!
- Distress edges of the Birch stamped panel with Soft Suede ink. Apply the distressing a little heavier on the bottom of the panel. TIP: Always start distressing off your project to reduce the chance of ink splotches.
- Layer Birch stamped panel with the Cherry Cobbler panel.
TREES
- Die-cut 3 pine trees from the Mountain Air dies from Mossy Meadow cardstock.
- Pounce on a little Mossy Meadow or Soft Suede ink onto the pines for depth. HINT: Use the Mossy Meadow cardstock that was your scrap when distressing Birch Panel.
SENTIMENT
- Stamp the sentiment from the Rustic Retreat stamp set using Soft Suede ink onto Crumb Cake cardstock.
- Color ‘WARM CHRISTMAS’ with Real Red Watercolor pencil.
- Die-cut sentiment using Tasteful Labels die.
- Distress ink the edges of the die-cut sentiment with Soft Suede ink. TIP: There is usually enough ink on the sponge or brush for this step.
GNOME
- Stamp gnome onto Crumb Cake cardstock using Soft Suede ink.
- Color gnome with watercolor pencils. I used Crushed Curry, Real Red, Old Olive, Early Espresso, and Basic Gray. I VERY LIGHTLY added Real Red to the nose to ‘pink’ it up.
- Use the Stampin’ Chalk Marker to add some white lines to the beard, mustache, and mistletoe.
- Add Wink of Stella to hat, beard, and ornament. TIP: Wink of Stella acts like a watercolor brush. I left the center of each colored stripe on the hat un-Winked.
- Fussy cut the gnome. (And no, I do not have a machine, I do this all by hand with those AWESOME Paper Snips!)

ASSEMBLY
- Layer as shown.
- Use a little liquid glue on the center trunk of the trees to attach.
- Use Black Dimensionals behind gnome.
- Tie a bow with Linen Thread and attache with a rolled glue dot.
- Add a tree or stamped image to the message insert.
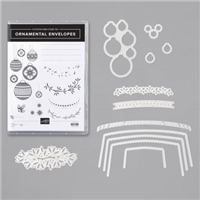
- Customize the envelope. I used the SUPER AWESOME new bundle Ornamental Envelopes (p40 of the mini-catalog)
THIS OFFER ENDS ON AUGUST 3RD. DON’T MISS OUT ON YOUR CHANCE FOR $5 BONUS BUCKS!
Let’s Get Super Excited
- You can order from my shop 24/7 or contact me anytime with questions.
- Leave me a comment. I’d love to hear from you.
- What did you like?
- What would you like to see more of?
- Need help implementing a technique? Ask me and I will see what I can do.
- HOST a WORKSHOP or CLASS? Contact me to get on the schedule. I will design a workshop based on your desires.
- JOIN MY TEAM Purchasing the $99 Starter Kit is one of the BEST DECISIONS EVER!
- Visit my PROJECT GALLERY for more paper crafting inspiration.
- Subscribe to PAPER PUMPKIN and get a different creative kit every month.
- SUBSCRIBE TO MY BLOG NOW!
- Ask me how to get your FREE catalog.
I CAN SHOW YOU HOW TO TAKE YOUR CARDMAKING & SCRAPBOOKING TO THE NEXT LEVEL.
SUPPLY LIST


BASIC TOOLS
MY FAVORITE NON-STAMPIN’ UP! TOOL
I LOVE these blending brushes. To clean, just rub excess ink off onto cardstock or on a damp cloth until no more ink rubs off. You do not need to have a different one for each color. They clean easily.
I have an Affiliate relationship with Amazon.com. If you order from this link, I will get a small percentage which I use to offset the costs of maintaining this blog.


Your ideas absolutely shows this site could easily be one of the bests in its niche. Drop by my website Article Sphere for some fresh takes about Ebooks. Also, I look forward to your new updates.
Informative articles, excellent work site admin! If you’d like more information about Mobile Operating Systems, drop by my site at Articleworld Cheers to creating useful content on the web!
I like the comprehensive information you provide in your blog. The topic is kinda complex but I’d have to say you nailed it! Look into my page Articlecity for content about SEO.
Hi there, I simply couldn’t leave your website without saying that I appreciate the information you supply to your visitors. Here’s mine Autoprofi and I cover the same topic you might want to get some insights about Auto Export.
You’ve done an impressive work on your website in covering the topic. I am working on content about Pain Management and thought you might like to check out ArticleHome and let me what you think.
This was a delight to read. You show an impressive grasp on this subject! I specialize about SEO and you can see my posts here at my blog Seoranko Keep up the incredible work!
Superb layout and design, but most of all, concise and helpful information. Great job, site admin. Take a look at my website Webemail24 for some cool facts about Web Servers.
I just had to compliment you on the selection of cards that Brian added to his blog, I so admire your creativeness I wish I had just a tiny bit of your imagination LOL
Thank you, Faith. I am sure that you have tons of creativity. Afterall, you are working with Stampin’ Up! products. It all starts with a CASE. Then tweak it here and tweak it there. Next thing you know, you are admiring your original work. I very much appreciate you taking the time to comment. Keep coming back for inspiration.
I have not been a gnome fan until now. I have come from Brian’s blog where he showcased your gnome cards. They are all adorable. I love this rustic one. That birch background really sets the style.
To love a gnome, you have to imagine the antics of a 10 year old. LOL! Brian was so kind to dedicate an entire blog post to my gnomies. Thank you for commenting and I hope you continue to take inspiration from my various projects.
I love, love this card; you did a beautiful job! I will definitely be making a few! I’ve always wanted to visit the Scandinavian countries and was able to do so a couple of years ago…Denmark, Norway, Finland, and Sweden. It was awesome! Of course, I fell in love with the gnomes and was thrilled to see them in the “Holiday Mini” Catalog. You’re rendition of this set is the best I’ve seen yet. Thank you for sharing your inspiration.
Thank you for the kindest compliment. Gnomes are the best! Need more…
This couldn’t be sweeter, Ann! I love everything about this sweet card! You’ve really forced me to rethink this set – didn’t think I needed it.
MUAHAHAHA!!!
So darn cute!!! And you could pair it with a gnome doorstop for a really cute gift!
I certainly could. It’s part of all things gnomey!:)
Love the combination of stamps and dies for this design. Just adorable. ❤️
Thanks, Linda!