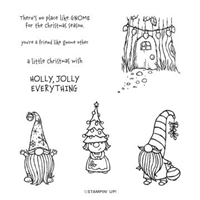
Gnomes are back for a quick visit this week. A big thank you from the gnomes and I to Brian King for dedicating an entire post to Ann’s World of Gnomes last week. I can see from all the viewers that you are curious about gnomes. Today I have 3 jolly gnomes who just can’t wait to share the season with you.
Using the Feels Like Frost Designer Series Paper as a background makes this card very simple to put together. Don’t you love the white and silver patterns? You can ink them with a sponge or brayer or just use them in their natural state (like I did in this card). I do like the soft images on the flip side but these hand-drawn images in silver foil are phenomenal. You get 48 double-sided sheets of 6″ x 6″ paper. There are 12 different designs and you receive 4 of each design. Don’t limit yourself to winter cards. Think about some anniversary (25th year) cards too!


Your wait is over. Here is my card with more jolly gnome-fun.

- Thick Whisper White cardstock:
- 4-1/4″ x 11″ scored at 5-1/2 for card base
- 2-1/2″ x 4″ for stamping 3 gnomes
- Whisper White cardstock: 4″ x 5-1/4″ for message insert
- Basic Black cardstock: 2″ x 2-1/2″ for sentiment
- Mossy Meadow cardstock:
- 4″ x 5-1/4″ for card front frame
- 3″ x 5-1/2″ for pine boughs
- Feels Like Frost DSP: 3-3/4″ x 5″ for card front
Stamp the Good Morning Magnolia image onto the vellum panel using Basic Gray ink. The lines will be blurred by the Stampin’ Blends and the alcohol to create a faux watercolor effect.
Color the image starting with the lightest color. Use Dark Daffodil Delight for the center. Dip a fine-tip paintbrush into the rubbing alcohol and gently move the color. I added Champagne Shimmer Paint to my rubbing alcohol.
Next, color non-adjacent petals with Dark Flirty Flamingo. Gently blur the stamped line. Let dry and repeat on other petals. Do the same for the leaves. TIP: Blow into a straw to gently direct the ink flow in the desired direction.
Add a second layer of color after the image is dry. Repeat the process of alcohol painting and gently blowing the ink.
OPTIONAL: Pick up some clean rubbing alcohol with the paintbrush and flick it over the image. This will create small droplets that will lighten some areas by moving the color outward.
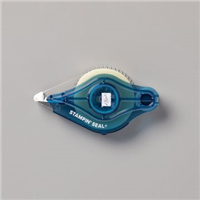
Adhere the vellum panel to the Basic White cardstock panel using Stampin’ Seal or a light amount of Multipurpose Liquid Glue. Add to Basic Black card base.
Stamp the sentiment in White Craft ink and heat emboss with with embossing powder. Trim to you liking. Add to card panel with small black Dimensionals.
Customize the message insert and the envelope with some flicks of color from the brush end of the Stampin’ Blends.
Gnomes
- Stamp 3 gnomes using Memento Tuxedo Black ink on Thick Whisper White cardstock.
- Color gnomes using Real Red Stampin’ Blends.
- Fussy cut gnomes.
- OPTIONAL: Add Snowflake sequins to gnome hats.
Sentiment
- Stamp sentiment from Christmas Gleaming stamp set on Basic Black cardstock using white craft ink (or Versamark). Before stamping put a small piece of tape over the ‘&’.
- Heat emboss with white embossing powder.
- Die-cut with Tasteful Labels die.
- Add black Dimensionals to the back of the label.
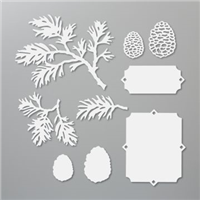
Pine Boughs
- Die-cut 2 of the 3-tip pine boughs from Mossy Meadow using the Beautiful Boughs dies.
ASSEMBLY
- Layer as shown.
- Add a twine bow to finish off the lower right corner of the sentiment. I used retired Real Red twine from the Country Club multi-pack. TIP: With thin twine, it is easy to make a triple string bow without adding too much bulk.
- Customize the message insert and envelope by adding some snowflake stamping using the Snowflake Wishes stamp set and silver metallic ink (I used Delicata Silver Metallic ink) or use Versamark and silver embossing powder.

I hope you enjoyed these 3 jolly gnomes and take a good look at the Feels Like Frost DSP.
Let’s Get Super Excited
- You can order from my shop 24/7 or contact me anytime with questions.
- Leave me a comment. I’d love to hear from you.
- What did you like?
- What would you like to see more of?
- Need help implementing a technique? Ask me and I will see what I can do.
- HOST a WORKSHOP or CLASS? Contact me to get on the schedule. I will design a workshop based on your desires.
- JOIN MY TEAM Purchasing the $99 Starter Kit is one of the BEST DECISIONS EVER!
- Visit my PROJECT GALLERY for more paper crafting inspiration.
- Subscribe to PAPER PUMPKIN and get a different creative kit every month.
- SUBSCRIBE TO MY BLOG NOW!
- Ask me how to get your FREE catalog.
I CAN SHOW YOU HOW TO TAKE YOUR CARDMAKING & SCRAPBOOKING TO THE NEXT LEVEL.


This is the cutest gnome card I have seen yet. Love it.
Thank you for the sweetest compliment.
Love what you’ve done with this set!
Thank you from all of us. Hugs, The Gnomes and I