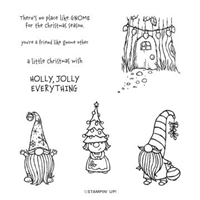
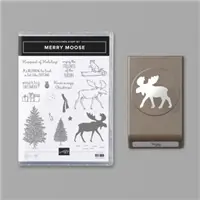
Once again we are back for more gnomology. (I am totally making up words!) Today I paired the Gnome for the Holidays stamp set with the Merry Moose bundle. Because we know that a Woodland Gnome takes care of the forest and all the animals of the forest.
FACTOID: from my Gnome book… Gnomes maintain close contact with animals. The gnome speaks their language and understands their problems. All animals, even rats and polecats, feel safe with gnomes and trust them. The animals know where to find the gnomes and will do his bidding without too much sulking.
Today’s gnome is in the forest telling the raccoon a grand story while the moose is hidden in the background listening intently. With that in mind, here is my card

Several of the techniques used in this card were discussed in previous posts. I will link to those posts in the instructions.
- Thick Very Vanilla cardstock:
- 4-1/4″ x 11″ scored at 5-1/2″
- 3/8″ x 2″ for sentiment (or larger and just trim to size)
- Basic Black cardstock: 3-3/4″ x 5″
- Crumb Cake cardstock: 5″ x 5″ stamp gnome, moose, and raccoon on a log (2)
- Soft Suede cardstock: 3-1/2″ x 4-3/4″ for embossed card panel
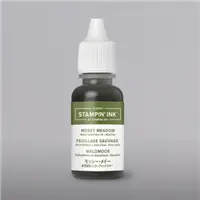
- Soft Sea Foam cardstock: smooshed with Old Olive and Mossy Meadow ink (See Technique HERE)
- ‘Tis the Season DSP: 3-1/2″ x 2-1/4″ for die-cut oval
Stamp the Good Morning Magnolia image onto the vellum panel using Basic Gray ink. The lines will be blurred by the Stampin’ Blends and the alcohol to create a faux watercolor effect.
Color the image starting with the lightest color. Use Dark Daffodil Delight for the center. Dip a fine-tip paintbrush into the rubbing alcohol and gently move the color. I added Champagne Shimmer Paint to my rubbing alcohol.
Next, color non-adjacent petals with Dark Flirty Flamingo. Gently blur the stamped line. Let dry and repeat on other petals. Do the same for the leaves. TIP: Blow into a straw to gently direct the ink flow in the desired direction.
Add a second layer of color after the image is dry. Repeat the process of alcohol painting and gently blowing the ink.
OPTIONAL: Pick up some clean rubbing alcohol with the paintbrush and flick it over the image. This will create small droplets that will lighten some areas by moving the color outward.
Adhere the vellum panel to the Basic White cardstock panel using Stampin’ Seal or a light amount of Multipurpose Liquid Glue. Add to Basic Black card base.
Stamp the sentiment in White Craft ink and heat emboss with with embossing powder. Trim to you liking. Add to card panel with small black Dimensionals.
Customize the message insert and the envelope with some flicks of color from the brush end of the Stampin’ Blends.
BACKGROUND
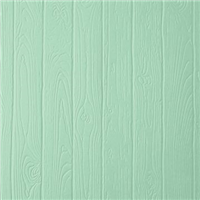
- Emboss Soft Suede panel with Pinewood Planks 3D embossing folder.
- Distress with Soft Suede ink and a blending brush or sponge wedge. TIP: To ground the focal point here, add more ink at the bottom of the embossed panel.
- Die-cut oval using Stitched Shaped dies.
- Adhere die-cut oval in the center of the embossed panel.
- Layer embossed panel onto the Basic Black panel.
GNOME
- Stamp the gnome on Crumb Cake with Soft Suede ink.
- Add some white highlights to the beard and mustache using the Stampin’ Chalk Marker.
- Use Wink of Stella to blur the stamped lines on the hat and beard. TIP: Wink of Stella acts similar to a Water Painter. I like to save my ‘used’ up Wink of Stella pens and use the brush for painting.
- Add a little Old Olive Stampin’ Marker to the boot and shirt.
- Use the Crumb Cake Stampin’ Blends to color in some highlights on the boots and shirt.
- Color the jingle bell with Soft Suede and Real Red Stampin’ Markers.
- Use a Real Red watercolor pencil to VERY LIGHTLY add some color to the nose.
- Fussy cut and add Black Dimensional to the back.
MOOSE
- Stamp the moose outline from the Merry Moose stamp set onto Crumb Cake with Soft Suede ink.
- Stamp the solid moose to fill in the outline with Soft Suede ink using the ‘stamped-off’ or 2nd generation stamp. TIP: Line up the stamped image by looking directly over the stamp to prevent a parallax error.
Parallax error occurs when the measurement of an object’s length is more or less than the true length because of your eye being positioned at an angle to the measurement markings. Orient your line of sight directly above the measurement marking on a ruler or similar device so that an imaginary vertical line connects your eye, the marking and the object. This is the same advice that I give for using the paper trimmer.
- Punch out the moose. (HAHAH – That sounds funny. Normally, I would say run if you see the moose.)
- Distress the edges of the moose with a blending brush or sponge wedge and Soft Suede ink.
RACCOON ON LOG
- Stamp the raccoon on a log twice with Memento Tuxedo Black ink on Crumb Cake.
- Color images with Stampin’ Blends: Smoky Slate, Basic Black, Crumb Cake, and Cinnamon Cider.
- Trim Raccoon off of one log.
- Use glue dot to add the log extension for the gnome.
- Add Black Mini-Dimensionals behind the log and raccoon.
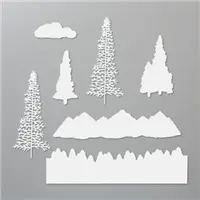
TREES & BOUGHS
- Prepare smooshed cardstock as directed in a previous post.
- Die-cut a tall pine tree from the Majestic Mountain dies.
- Die-cut 3 or 4 small bough bundles from the Beautiful Boughs dies.
SENTIMENT
- Stamp the sentiment from the Itty Bitty Christmas stamp set using Soft Suede ink on Thick Very Vanilla,
- Trim to size.
- Distress edges with a blending brush or sponge wedge and Soft Suede ink.
- Add Black Mini Dimensionals behind sentiment strip.
ASSEMBLY
- Assemble as shown.
- Customize the envelope and message insert with DSP, a stamped image ordie-cut.

You might be able to see the stamped lines for the moose that I added, but then decided that they were unnecessary.
And there, my gnomey friend, is the Woodland Gnome in all his glory. What story do you think he is telling? I’ll bet he is talking about how wonderful the NEW August – December 2020 Mini Catalog is from Stampin’ UP! If you do not currently have a Stampin’ Up! Demonstrator, I would love to be your creative coach!!!
Let’s Get Super Excited
- You can order from my shop 24/7 or contact me anytime with questions.
- Leave me a comment. I’d love to hear from you.
- What did you like?
- What would you like to see more of?
- Need help implementing a technique? Ask me and I will see what I can do.
- HOST a WORKSHOP or CLASS? Contact me to get on the schedule. I will design a workshop based on your desires.
- JOIN MY TEAM Purchasing the $99 Starter Kit is one of the BEST DECISIONS EVER!
- Visit my PROJECT GALLERY for more paper crafting inspiration.
- Subscribe to PAPER PUMPKIN and get a different creative kit every month.
- SUBSCRIBE TO MY BLOG NOW!
- Ask me how to get your FREE catalog.
I CAN SHOW YOU HOW TO TAKE YOUR CARDMAKING & SCRAPBOOKING TO THE NEXT LEVEL.
SUPPLY LIST


BASIC TOOLS
MY FAVORITE NON-STAMPIN’ UP! TOOL
I receive a referral stipend from Amazon.com when your purchase using my links. I use these funds to help maintain my blog.
I love these blending brushes. It is easy to get a smoother application of color without a splotchy look. They are so easy to use and they give you the control needed to get good results with stencils, and card backgrounds. TIP: Hold the brush by the head when blending for more control. They come in 5 sizes ergonomically designed to help with ink blending of all water-based inks. Blend excess ink off onto a scrap piece of cardstock or damp rag between colors, Clean with gentle soap and water and allow to air-dry.
I have an Affiliate relationship with Amazon.com, if you use this link to purchase these brushes, I will receive a small compensation. Funds received are used to offset the costs of maintaining this blog. I really appreciate your readership and using this link if you are interested in the products that I use.


